|
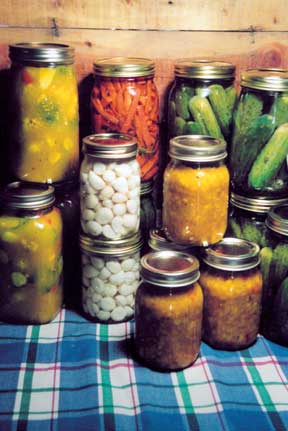 Homemade
Pickles and Relishes Homemade
Pickles and Relishes
...a wonderful
way to turn autumn harvest into winter treasure
by Linda Gabris
When I was growing up in the backwoods of Muskoka, my grandparents
had one of the biggest gardens in the countryside. Come autumn,
there was nothing I enjoyed more than helping Grandma “put
up” bushels of canned goods to stock the cellar shelves
for winter use.
Of course, in those days “putting food by”—or
canning—was an important way of life. We seldom went
to town to shop for groceries in winter. Even though I now
have easy access to year-round shopping, I still take great
pleasure, pride and comfort in doing up my own preserves and
condiments, including pickles and relishes from the bounty
of my backyard garden.
It brings me great joy to open a sparkling jar from the cellar
and boast: “yes, indeed, it’s homemade!” But
you don’t need a garden; you can get reasonable buys
on seasonal produce at local farmers’ markets, roadside
fruit and vegetable stands or even in grocery stores.
As far as home-canning goes, the rules have changed a little
since my younger days! Canning jars have been updated, and
home canners today have a set of basic rules laid down by
experts to help ensure food is canned safely and does not
spoil.
The antique sealers my Grandma used (known as bailed or lightening
jars) with glass lids, rubber rings and wire clamps are no
longer recommended and have been replaced by modern, self-sealing
jars such as Mason jars.
Mason is the name of the maker who in 1858 patented the first
jars with handy screw-on caps, rather than bails. The Mason
jar became so popular it went down in history as both a commercial
and household name. Health Canada advises that home canners
today use modern Mason-style jars, fitted each season with
new self-sealing lids and screw-on bands.
Mason jars are made of heavy glass that withstands heat under
pressure without breaking. Using unapproved jars, or those
that commercial food has been purchased in (and yes, I know
first hand that some old- timers have done just that!) are
apt to break under pressure and should never be used for processing
food at home.
First and foremost, make sure your jars are free of nicks
and are fitted with new seals every season, as the sealing
compound loses its muscle after use. You can reuse the screw-on
bands so long as they are not bent or rusted.
Jars must be sterilized before filling. Wash first in hot
sudsy water, then scald. Put jars in a large kettle of water,
making sure they are completely covered. Heat to boiling,
then continue boil for 15 minutes. Keep jars in hot water
until ready to fill with food.
Process the seals according to directions on the box. Most
brands are submerged in hot water to soften the sealing compound—but
not boiled, as this can damage the seal. Since manufacturers
directions may vary, read and follow carefully.
Use only top quality ingredients. Let’s face it, if
you make dill pickles out of sandy, wilted cukes you can bet
your pickles will be gritty and lack crispness. Same goes
for making corn relish out of moldy ears of corn! The finished
product will not be blue-ribbon worthy. Harvest your vegetables
when they are prime for picking—on canning morning for
best results—and wash thoroughly, then hold in icy cold
water.
For long-term storage, you must “heat process”
all home canned foods, either by a boiling water bath or in
a pressure canner. In the following recipes, high acid foods
such as pickles and relishes (which have large amounts of
acid added in the form of vinegar) can be safely processed
in a boiling water bath.
Even though Grandma processed all her foods the old-fashioned
way in a boiling water bath, this practice for low-acid foods
such as vegetables done up without the aid of vinegar (canned
peas, beans, asparagus) is not recommended today. For safekeeping,
these types of low acid foods must be processed in a pressure
canner.
The following recipes are well-suited for processing in the
boiling bath fashion. Because the temperature in the jars
never exceeds 212º Fahrenheit, it is suitable only for
such strong acid foods as pickles and other vinegar-prepared
items. The bath does three important things: kills bacteria,
yeast and molds that cannot live at such a temperature; drives
out air in the food which can cause spoilage; and seals the
jars.
In order for the bath to work properly, the jars must be
kept completely submerged at least two inches under water,
and the water kept at a full rolling boil for the exact times
indicated. Take note that cooking time of the recipe is NOT
counted as part of the processing time. To thoroughly destroy
all microorganisms that can cause food to go bad, the food
must be heated to proven temperatures as stated in time-honoured
recipes.
Any lidded kettle deep enough to accommodate the size of
jars being processed, and fitted with a wire or mesh to hold
jars slightly off the bottom, will suffice as a boiling-bath
canner. There are inexpensive, large, enamel kettles specially
designed for the purpose available at hardware stores. They
come with perforated or wire mesh racks to allow water to
circulate properly.
Before starting, gather all equipment. As well as a boiling
bath kettle, ample jars and new seals, you will need a large
earthen, glass or stainless steel bowl for soaking, and a
large, heavy-bottomed kettle for pre-cooking food. Fill your
tea kettle with water and keep it whistling throughout your
canning session for a ready supply of boiling water. Have
an alarm clock or kitchen timer to ensure proper timing. Round
up a ladle, measuring cup, jar-lifter and spatula and you’re
ready to roll.
HOW TO USE THE BOILING WATER BATH
With rack in place, put boiling bath kettle on large burner
of stove. Fill with water to halfway mark. Start heating.
Prepare food as stated below. Fill hot, sterilized jars leaving
1 inch headspace with prepared food. Wipe jar rims with clean
dishcloth that’s been dipped in hot water. Follow manufacturer’s
directions for preparing and adjusting lids. When all jars
have been filled and capped, lower into hot water. Add enough
boiling water to cover at least 2 inches above the tops of
jars. Put lid on kettle. When water comes back to an even
boil, begin timing, adding boiling water if needed to keep
covered. When time is up, remove jars and allow to cool undisturbed
for 24 hours, keeping upright. Remove screw bands and check
for proper seals. A properly sealed lid will curve downward—in
other words, the seal will be “sucked” down. If
the jar is not properly sealed, it must be stored in the fridge
and treated as an already-opened jar. You can replace the
bands lightly or store the jars without bands. Label and store
canned foods in a cool, dark place. Canned foods have a shelf
life of about one year. Do not eat canned foods that have
an “off” odor or colour or that show any signs of
leakage.
 GRANDMA’S
OLD-FASHIONED GRANDMA’S
OLD-FASHIONED
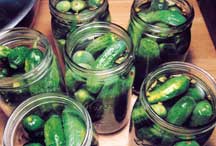
KOSHER STYLE GARLIC DILLS
Grandma always said, “Pick cukes in the morning and
pickle before lunch if you want a really super pickle.”
Select uniformly sized, firm, fresh pickling cucumbers. This
recipe can be halved, doubled or tripled depending on the
size of your crop. Let these pickles age for at least three
weeks before cracking open a jar. Makes 8 quarts (950 ml jars)
8 pounds (3.6 kg) pickling cucumbers
A large pan that holds enough water and ice to cover cukes
(Grandma soaked hers in fresh-drawn, ice cold, well water)
8 sprigs of fresh dill
32 cloves whole peeled garlic
8 tablespoons (105 ml) pickling salt
8 teaspoons mixed pickling spice
8 cups white vinegar
8 cups water
Wash cucumbers and scrub lightly with vegetable brush removing
sand. Rinse under cold running water. Put cucumbers in large
bowl and cover with water. Add ice and let stand for an hour
if fresh picked. If more than two hours since picking, let
stand for at least 4 hours to firm up, adding ice as needed
or keep in fridge under water.
Make pickling liquid by mixing vinegar and water in large
kettle and bringing to boil. Reduce heat and keep simmering
while filling jars.
Place 1 sprig of dill, 4 cloves garlic, l tablespoon pickling
salt and 1 teaspoon pickling spice into each jar.
Pack cucumbers standing upright. Add pickling liquid to cover,
leaving headspace. If more liquid is needed, make by mixing
equal parts vinegar and water, and bringing to a boil.
Using a spatula, lift out air bubbles. Follow directions
for proceeding with boiling water bath. Process for 15 minutes.
 AUNT
MERNIE’S CHUNKY MUSTARD PICKLES AUNT
MERNIE’S CHUNKY MUSTARD PICKLES
The story goes that Aunt Mernie got this recipe from Grandma.
But over the years—after adding a pinch of this and a
pinch of that—she perfected the pickles to the point
that Grandma had to ask for her recipe. (Grandma used chunks
of peeled yellow, seeded garden cucumbers. Aunt Mernie used
unpeeled pickling cukes cut into fours; perhaps that’s
why hers were so much more gourmet) Makes about 5 quarts (950
ml jars) or about 10 pint-sized jars.
2 quarts of sliced cukes (prepared either Grandma’s
way, or Aunt Mernie’s)
2 cups sliced onions (for gourmet use baby or pearl onions)
1 cauliflower, cut into small flowerets
2 sweet red peppers, cut into chunks
1/2 cup pickling salt
2 cups vinegar
1 cup water
3 cups sugar
2 teaspoon celery seed
pinch each of ginger and curry powder
2 tablespoons mustard powder
1 tablespoon turmeric
3/4 cups flour
1 cup water
Place cucumbers and onions in large bowl. Sprinkle with salt.
Let stand one hour. While soaking, steam the cauliflower and
peppers until barely tender. Drain.
Drain cucumbers and onions. Rinse under cold running water.
Add cooked vegetables and mix well.
Place vinegar, water and sugar in pot and heat to boiling.
Whisk dry ingredients with water until smooth and slowly blend
into vinegar mix, cooking until thick and smooth. Add vegetables
and bring to rolling boil.
Ladle into jars. Proceed with boiling water bath, processing
20 minutes.
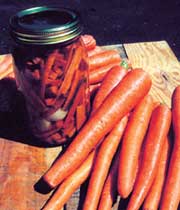 SPICY
DILLED CARROTS SPICY
DILLED CARROTS
Great colour and crunch for any pickle platter.
Make one jar of super long sticks for cocktail stirrers. Makes
8 quarts (950 ml jars)
7 pounds carrots
6 cups white vinegar
2 cup water
1 cups sugar
½ cup pickling salt
16 cloves garlic
8 sprigs dill
8 hot peppers (or 8 pinches of hot dried chili peppers)
2 tablespoons pickling spice
Scrub carrots. Cut into sticks of desired size. Drop into
icy water until all are carrots are prepared.
Mix vinegar, water, sugar and salt, and bring to boil. Keep
hot.
Put 2 cloves garlic, 1 sprig of dill, 1 hot pepper or pinch
of chili pepper and ¼ teaspoon pickling spice into
each hot jar. Pack carrot sticks to within ¾ inch of
rim. Add boiling brine to cover.
Remove air bubbles. Proceed with boiling water bath. Process
for 15 minutes.
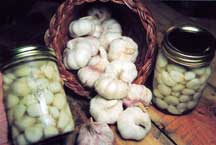 PERKY
PICKLED GARLIC PERKY
PICKLED GARLIC
If you don’t grow your own, buy a braid or two of garlic
especially for pickling. This recipe can be doubled, if you
wish.
If garlic is difficult to peel, blanch in boiling water for
20 seconds, then submerge in cold water.
This should help to loosen the skins.
Garlic, separated into cloves and peeled, enough to fill
3 pint sized jars.
3 1/2 cups of white vinegar (more as needed)
1 tablespoon pickling salt
2 tablespoons pickling spice
4 tablespoons sugar
1 teaspoon crushed chilies
Combine all ingredients, except garlic in kettle and bring
to a boil. Simmer three minutes.
Pack hot jars with garlic. Cover with boiling brine solution
to within ½ inch of rim. Wipe jar rims and put on lids
and screw bands. Cool, then store in refrigerator until used.
This keeps for several months in fridge without processing
in boiling water bath. For bigger batches for long term storage
on cellar shelves, it’s advisable to process in boiling
water bath for 15 minutes.
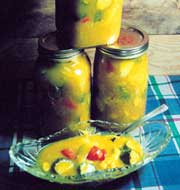
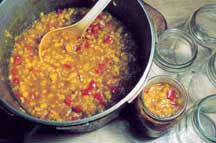 CORN
NUGGET RELISH CORN
NUGGET RELISH
So pretty, so good. In our house we use corn relish in place
of salsa for dipping and dunking everything from nachos to
celery sticks. Makes 3 quarts (950 ml jars) or 6 pint-sized
jars.
6 cups fresh corn, cut off the cob
1 cup chopped onion
2 cups chopped sweet red peppers
1 cup sugar
1 teaspoon salt
1 teaspoon pepper
1 teaspoon mustard seed
1 teaspoon celery salt
2 cups cider vinegar
3 tablespoons mustard powder
1 tablespoon turmeric
1/2 cup flour
1/2 cup cold water
Put first 9 ingredients into kettle and mix well. Bring to
boil. Lower heat and simmer for 1 hour, stirring often. Combine
mustard powder, turmeric, flour and water in bowl and mix
until smooth. Slowly blend into corn mixture, stirring until
thick. Cook until bubbles break surface for 3 minutes, stirring
constantly.
Ladle into hot jars. Proceed as above, processing pint jars
10 minutes and quart sealers 15 minutes.
This is an original story,
first published in The Country Connection Magazine,
Issue 47, Autumn 2004. Copyright Linda Gabris.
RETURN
TO STORY INDEX
RETURN
TO BACK ISSUE PAGE
RETURN
TO RECIPE PAGE
To purchase this issue of The Country Connection, please send a cheque to:
Gus Zylstra, 691 Pinecrest Road, Boulter ON K0L 1G0, Canada
In Canada: $4.95 + 2.20 shipping + .93 HST = $8.08
In the USA:$4.95 + 3.80 shipping + 1.14 HST = $9.89
|


